Azure Managed Disks are a great choice for storage in the Azure cloud. But there are a few things to understand when using Azure premium disk.
Azure premium disk comes in four variants:
- Ultra Disk.
- Premium SSD Managed Disks.
- Standard SSD Managed Disks.
- Standard HDD Managed Disks.
Learn more about Managed Disks pricing
You can purchase different capacity disks from each variant (Example for Premium SSD Managed Disks, you can purchase from a P1 Disk with a 4GB capacity up to a P80 Disk with 32TB capacity). You will also want to note that as the capacity of the disks increase, so does the performance characteristics (throughput and IOPs) of the disk. And in some cases, you may need to purchase more capacity just to get the performance you need.
When planning your deployment with SoftNAS or other solutions, you will want to avoid configuring a mix of different size disks for a data pool in most cases to achieve more deterministic performance.
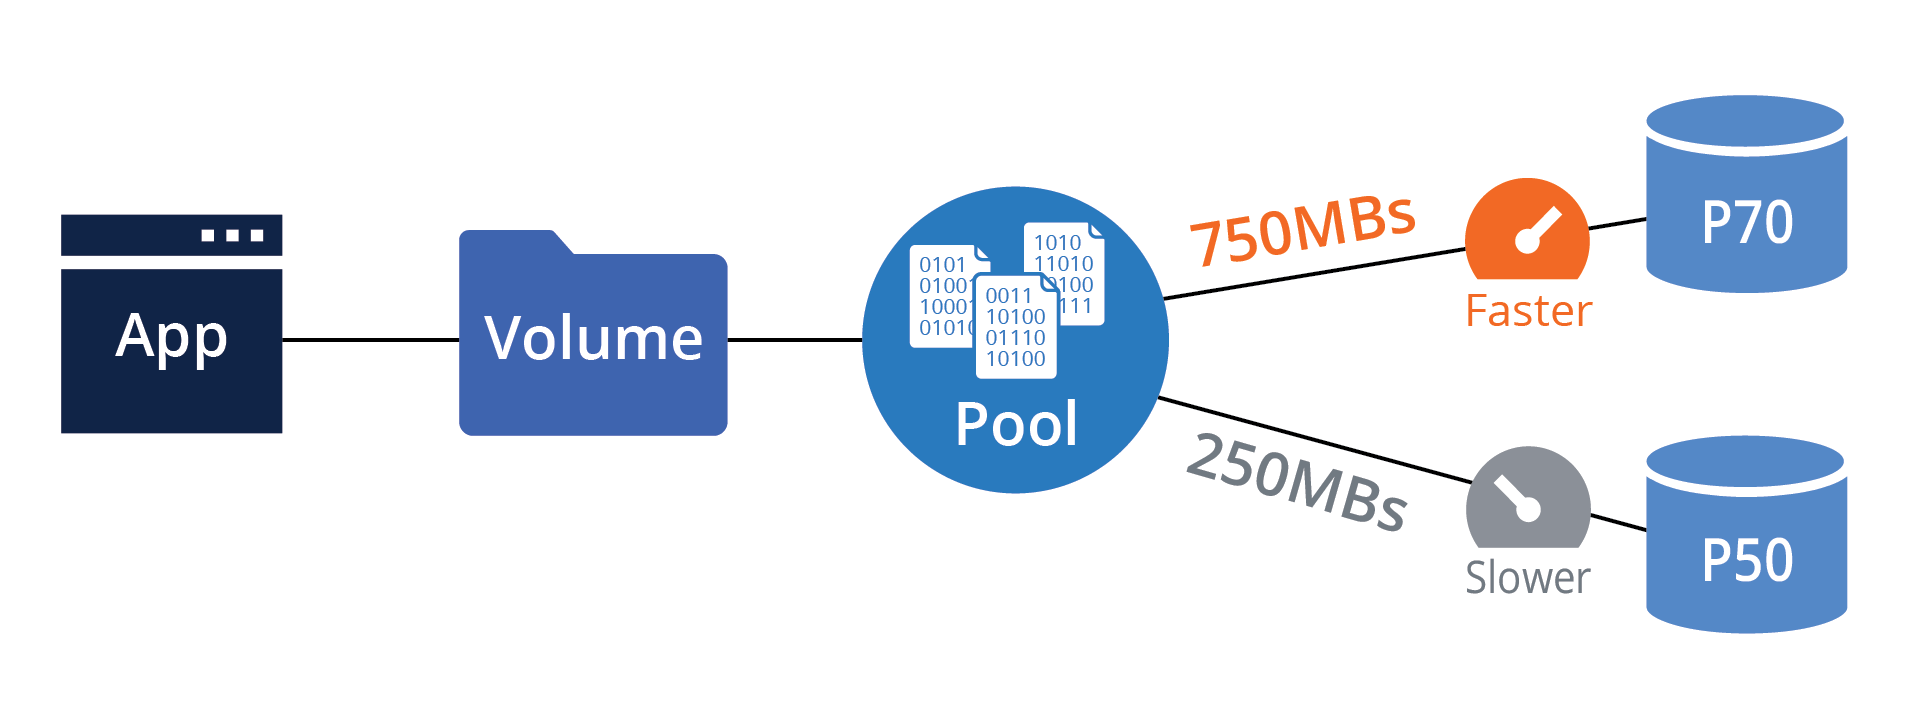
For example, if you decide you need 20TB of storage and you select 1 P70 disk (16TB) and 1 P50 disk (4TB) to create a 20TB data pool, you may notice strange performance characteristics. Why is this? It’s because your volume is split across a P70 disk with 750 MBs throughput and a P50 disk with 250 MBs throughput. If your application may run great when its accessing data from the P70, and they you may notice performance degrades when it accesses data from the P50 disk.
This is a reason to not get mixed up when using Azure Managed Disks, if you expect deterministic performance across your workload. Note, this is true across whatever type of Azure Manage Disk you use (Ultra, Premium SSD, Standard SSD or Standard HDD), mixing different size disks in a data pool can cause performance anomalies.
What’s my best option to prevent such anomalies? It depends on what problem you are trying to solve.
I’m looking for the best cost savings, and some inconsistent performance is acceptable:
For this example, let’s say you only need 5TB of capacity. In this case you can mix disk capacities, as long as the performance of the slowest disk meets your requirements (200MBs in the below example):
- 1 P30: 1 TB and 200MBs throughput
- 1 P50: 4 TB and 250MBs throughput
As long as you are OK that sometimes your workload will be capped by the lower performance of the P30 disk, this is the cheaper option. If your workload does not require greater than 200MBs performance, you should be fine.
I need consistent performance:
For this example, let’s say you need 10TB of capacity, but you know that you required about 350MBs of throughput. Mixing disks like below may cause issues because when accessing data from the P40 disk:
- 1 P40: 2 TB and 250MBs throughput
- 1 P60: 8 TB and 500MBs throughput
When accessing the data on the P40 disk, you will not get the required 350MBs through put.
So what can you do?
One option is round up your storage using only disks that provide the required throughput.
- 2 P60: 16 TB total and 500MBs throughput
But now you are paying for an extra 6TB.
A better solution is to leverage the aggregate throughput of a set of disks in a Pool. For example, instead of using 2 P60 disks, you may consider creating a Pool of 5 P40 disks and leverage the aggregate throughput of all 5 of the P40 disks. This not only can help you get better performance, but in some cases can be more cost effective.
2 P60 Disks:
- Total Capacity: 16TB
- Price: $1720.32
- Aggregate Disk Throughput: 1000MBs
5 P40 Disks:
- Total Capacity: 10TB
- Price: $1177.60
- Aggregate Disk Throughput: 1250MBs
Seems simple enough, but there are a few other factors to consider when planning your deployment.
Max Data Disks for your selected VM
If your analysis steers you towards an option to use more smaller capacity disks to get the performance you require, you will want to check the Max Data Disks allowed for your chosen Azure VM to run SoftNAS or other solution on. For example, a D2s_v3 VM only allows 4 data disks and would not allow you to connect 5 P40 disks as shown in the above example. In this case, you would either need to use a combination of larger capacity disks to reduce the disk count or select a larger VM with a higher Max Data Disk count. You can refer to Microsoft Azure documentation to review the Max Data Disk counts for VMs.
Max Throughput for your selected VM
The next factor to consider is the max throughput that your selected VM can provide. Just because the disk combination you selected can give you the performance you need, you need to ensure the VM you selected also allows enough throughput between your Data Disks and VM. You will want to refer to the Uncached Data Disk Performance number (throughput and IOPs) and other documentation related to burst and non-burst performance in the Microsoft Azure documentation for the selected VM to ensure that the VM you deploy does not throttle disk performance below your required performance.
When considering Azure Managed Disks for use with Buurst SoftNAS, you should consider:
- How much storage capacity is required?
- What are the performance requirements of your workload?
- What VM choices do I have that enable the capacity and performance required?
Once you done a little homework, then it’s time to do some testing to verify that the choices you’ve made for your deployment meet your real-world requirements. You may find you have overestimated your requirements and can save some money with lower performance disks or VM or underestimated and need more performance from your storage or VM. This is where the cloud is great and allows you to reconfigure your deployment as needed.


