SQL Server backups on AWS EC2 using iSCSI shared storage

SQL Server backups on AWS EC2 using iSCSI shared storage

We recently had a customer contact us with an interesting use case – backing up Microsoft SQL Server to shared storage by using iSCSI. Most SoftNAS customers use NFS and CIFS in the cloud, and it has been less common to see iSCSI used on AWS EC2, so this caught my attention.

The Problem: SQL Server Backups in the cloud

The fundamental problem was backing up large SQL Server databases. SQL Server runs as a Windows service and cannot mount traditional Windows shares that require authentication within the domain. Other requirements included:

  • – Completely deployed in cloud at AWS with SQL Server running on Amazon EC2
  • – Silos of storage, hard drives per server (EBS mounted per individual instance)
  • – Running into SQL Server database problems can necessitate backup recovery
  • – EBS on SQL Server are striped for performance (RAID 0 x 12 drives)
  • – Mounting of iSCSI from SQL Server to a shared storage server that would allow recovery later was desired
  • – Provisioned IOPS with EBS optimization for high throughput
  • – Full backups once per week
  • – Incremental / differentials every 15 minutes
  • – Windows file sharing – some services can’t write to CIFS share because it’s
  • – Making backup and then copying over it (prior approach) – risks being down with no backup if failure occurs during backup

The Solution: SQL Server Backup storage in the cloud

The solution chosen was SoftNAS running on AWS. It supports iSCSI-mounted drives that look like a local disk to SQL Server, which can’t authenticate to a Windows share.

  • – Using SoftNAS for backups of mission-critical SQL Server data
  • – “What really caught my eye was iSCSI, eliminate network drive (looks like a local drive)”
  • – “Was using EBS snapshots – lots of space, disorganized”
  • – Using storage snapshots, which don’t take up additional space, and don’t overwrite prior versions
  • – Deduplication and compression saves actual storage space

How to create the SQL Server Backup configuration

The following high-level steps can be used to create a SQL Server Backup server using SoftNAS:

1. Go to AWS Marketplace and launch a SoftNAS instance (a C3.Large instance should be sufficient to start)

2. Attach EBS volumes to the SoftNAS instance; e.g., attach 6 x 1 TB EBS volumes for around 5 TB usable space (or appropriate number of EBS volumes for your needs). If you need higher throughput, then configure the instance as an EBS optimized instance and enable EBS provisioned IOPS for higher throughput

3. In SoftNAS StorageCenter, partition the disk devices, then add them to create a Storage Pool using RAID 5 (RAIDZ1) for added data integrity. For higher write throughput, a RAID 10 configuration can be used instead.

4. In StorageCenter, choose Volumes and LUNs. Then Create Volume and assign the volume to the Storage Pool from step #3, and give it a volume name. Choose block device (LUN) as shown below:

SQL Backups

You can thin-provision the volume / LUN or choose a maximum size, which will preallocate the space from the storage pool and reserve that space for the LUN

When you press Create Volume, the LUN will be created, and it will be automatically assigned to the default iSCSI Targets (you can view in iSCSI Targets, where you can restrict access to the iSCSI Target by restricting access only the SQL Server or appropriate IP range)

5. On the Windows server that is running SQL Server, at the Start Menu (or in Control Panel) choose the iSCSI Initiator. Enter the private IP address of SoftNAS and choose “Quick Connect”. You should see the storage target appear in the list box. From here, you can Connect, Disconnect and view properties of the targets.

6. Using Server Manager, choose Storage > Disk Management. You will see a disk device that is unused. Use standard Windows disk drive device initialization and formatting (Initialize Disk, Create Disk, etc.) to create a Windows disk device using iSCSI, assigning it a drive letter.

At this point, you now have an iSCSI-mounted disk device on the SQL Server machine. The device appears like any other local disk drive to SQL Server, so there will be no authentication required by SQL Server when performing full or incremental backups.

7. Run a full backup of SQL Server on a weekly basis (for example), and schedule incremental backups every 15 minutes (or whatever best fits your needs). Also, ensure your transaction logs are saved, as needed.

Other factors you may want to consider:

  • – Using compression and/or deduplication on the Volume / LUN settings to improve storage efficiency
  • – Creating a custom snapshot schedule for the backup volume that better matches your backup recovery objectives
  • – Using another SoftNAS instance in a different region (or availability zone) as an offsite DR backup
  • – Use of S3 disk devices instead of EBS volumes, if less performance is required

The use of iSCSI in Windows to provide seamless access to shared storage provides a quick, efficient way to manage backups in the cloud for SQL Server and other databases. By combining iSCSI with NAS features like deduplication, compression and RAID, one can quickly create a cost-effective high-performance backup for SQL Server and SharePoint in the AWS cloud.

Many companies are moving SQL Server deployments to the cloud. If you are moving an app that is using SQL Server to the cloud, you will want to achieve the best performance possible, while keeping costs lowSoftNAS can be used in the cloud to optimize SQL performance and free up resources.  By reducing resource load on the SQL Server businesses will benefit from lower SQL licensing costs, and reduce the cost associated with cloud storage.  


Check Also:

Why SoftNAS Enterprise for Microsoft Azure?
Crank Up the Performance for Your Cloud Applications
Increase Reliability and Reduce Costs for Cloud Backups
Breaking the Million IOPS Barrier on AWS with NVMe for HPC

SoftNAS S3 Cloud Disk for SoftNAS – Sneak Peek

SoftNAS S3 Cloud Disk for SoftNAS – Sneak Peek

We are wrapping up QA on a major new feature of SoftNAS – the Amazon S3 Cloud Disk. These cloud disks extend SoftNAS storage to include virtually unlimited, inexpensive cloud disk storage using Amazon’s venerable S3 storage backbone. This is a big deal for our customers who need large amounts of affordable cloud storage.

Here’s how it works.

First, you open an Amazon Web Services account. Next, you install SoftNAS (available in the AWS Marketplace, free micro instance), SoftNAS Essentials or SoftNAS Pro. Note that the S3 Cloud Disks can be used on-premise running on VMware, or in the cloud within any of the AWS regions worldwide.

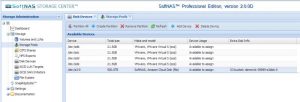
Next, you simply add a new S3 Cloud Disk to your SoftNAS installation, which appears in the list of available disk devices as shown below:

6

In this example, we have created a 500 TB cloud disk, which is thin-provisioned, so it only takes up actual storage space as you use it.

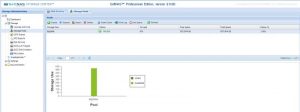
Next, a storage pool is created using the Amazon S3 Cloud disk, as we see below:

7

You now have up to 500 TB of cloud storage at your fingertips. And it includes all the SoftNAS feature set, including caching, compression, deduplication, scheduled snapshots, etc. – all on top of S3. By itself, S3 storage may not be fast enough for some use cases, especially when running it in a colo or company-owned data center; however, with SoftNAS acting as the NAS ‘front end’ to S3, you can now get the best balance of performance and long-term data durability provided by S3.

And if you’re running S3 Cloud Disks on SoftNAS directly within Amazon EC2, then you’ll get the best performance as everything is running together in the cloud.

More on this exciting new cloud storage feature of SoftNAS will be coming soon. You can see it in action in our booth at AWS re:Invent, November 12 – 15 in Las Vegas. Of course, it will be available for download at that time, as well.

Off-site Data Replication and Cloud Disaster Recovery for Amazon EC2

Off-site Data Replication and Cloud Disaster Recovery for Amazon EC2

Off-site Data Replication and Cloud Disaster Recovery for Amazon EC2

In the cloud world we live in today, it’s important not only to protect corporate data and IT infrastructure from outages and failures, but also meet expected Recovery Time Objectives (RTO) and service levels established by the business for its critical applications. In the event of logical or physical failures, it must be possible to recover and restore service levels quickly with no loss of data. In the event of a catastrophic disaster that takes down primary IT infrastructure, the ability to bring the business back online in a reasonable time frame is paramount – to business continuity and IT management careers.

When we manage our own data centers, we have more control over what happens, enabling IT and management to better contain and mitigate risks. When we outsource IT infrastructure or move IT systems and data into data centers controlled by others, there is a real loss of control – we are beholding to the cloud providers. However convenient it may be to have a vendor to blame for an outage, ultimately management is responsible for restoring business operations and service levels.

So how can we reap the many benefits of moving business-critical applications, data, and IT infrastructure into the cloud, into third-party data centers and managed service providers, yet retain enough control to recover safely from even the worst possible failure and disaster scenarios?

In a word – replication. By replicating our data from a primary data center to another location, we have the ability at any point to switch over to a secondary data center to continue operations, even in the face of the most devastating disasters. If replication is such an obvious solution, why don’t more businesses take advantage of it? Historically, it has been too costly to duplicate the IT infrastructure required.

Fortunately, the very on-demand nature of cloud computing infrastructure lends itself well to implementing cost-effective off-site disaster recovery.

It all starts with replication of the most critical part of IT infrastructure – corporate data and IT data. Corporate data includes all the databases, office files, file servers and other business data. IT data includes the “meta data” and systems required to quickly reconfigure and recover infrastructure after a failure has taken place.

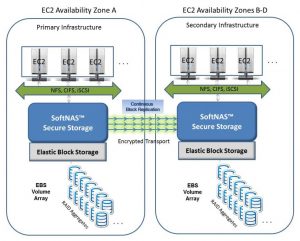
The following diagram shows, for example, how off-site data replication and cloud disaster recovery can be configured using Amazon EC2. SoftNAS SnapReplicate(tm) provides the solution.

loud disaster recovery can be configured using Amazon EC2

We see two sites in the above diagram – a set of Primary Infrastructure running in one Amazon EC2 availability zone (AZ), and Secondary Infrastructure in a different availability zone (or regional data center). The Amazon EC2 virtual machine workloads, or instances as they are called, connect to shared storage managed by SoftNAS.

SoftNAS provides the bridge between EC2 computing and commercial-grade Elastic Block Storage (EBS), with advanced NAS features like scheduled snapshots, compression, error detection and recovery, RAID array protection, and more.

The Primary and Secondary data centers are connected via “continuous block replication”. As data is written by the primary systems, the data changes are packaged up and transmitted securely over the network from the Primary to the Secondary on a continuous basis. Continuous replication keeps the Secondary site “hot” – ready for use at all times.

In the event of a simple failure, such as a failed EBS volume, the RAID array compensates and no downtime impacts occur. However, should an entire Amazon availability zone go down (e.g., a major network switch or router fails, critical power failure, server failure, etc.), computing instances and their data unexpectedly and instantly become unavailable for the duration of the outage.

With the above configuration, it’s a matter of making a few DNS changes and failing over to the Secondary system, bringing up the required computing instances on the Secondary and restoring normal service levels – which can be accomplished in 30 minutes or less.

With SnapReplicate, the IT administrator simply issues a “Takeover” command on the Secondary node, updates DNS entries and starts up the workload instances (web servers, database servers, application servers, etc.). Within a matter of minutes, DNS updates get replicated throughout the Internet and service levels return to normal. mitigating the outage.

Continuous Protection

SnapReplicate provides continuous protection, 24 x 7 x 365, ensuring there’s always an identical Secondary environment with up-to-the-minute data from the Primary, right up to the point of a failure event. The Secondary now takes on the role as the new Primary.

Later, when the failed cloud services are restored, the Primary running in availability zone B/C/D is connected back to the new Secondary node in zone A. Once an initial re-sync replication cycle is completed, the two sites are now synchronized again. Normal operations can simply continue in this new configuration, or during a scheduled maintenance window, a “Giveback” command can be issued to “fail back” control to AZ A, which becomes the Primary once again.

The beauty of the SnapReplicate cloud DR solution is that it solves both the full-scale site redundancy problem, and it does so at a fraction of the normal cost. On the Secondary site, only the SnapReplicate target is required to be operational – all other computing instances can be stopped, so that no hourly charges are incurred until the Secondary site is actually required fully online.

Better Than Clustered Filesystems

Unlike clustered filesystems, like GlusterFS and others, SnapReplicate is much more cost-effective, performs better and costs less to operate – and there’s no risk of the “split-brain” data corruption problems that occur with clustered filesystems, where nodes can get out of sync with each other, resulting in data corruption, application and website failures.

Clustered filesystems must compare files and folders across all nodes to detect and synchronize any data changes. This works okay in smaller lab implementations, but in real-world practice, you typically have tens of thousands to hundreds of thousands of files. The enormous number of files causes clustered filesystem replication to get caught up in an endless replication cycle – sort of like painting the Golden Gate bridge – by the time you can finish, it’s time to start all over again.

Clustered filesystems are also slower, penalizing every write operation by making each write wait for completion and confirmation by all nodes.

The end result is, clustered filesystems result in much greater bandwidth consumption across the sites, with correspondingly higher bandwidth costs to operate the system on a 24 x 7 basis. Worse yet, as the number of nodes increase, so do these costs and performance impacts.

On the other hand, SoftNAS uses ZFS – a proven, reliable high-performance copy-on-write filesystem – which only stores data changes once. And within one minute or less, SnapReplicate ensures all data changes are replicated from the Primary to the Secondary node. And since only the actual changed data blocks are sent over the wire, there is no need for repetitive, wasteful file comparisons at any time.

More Useful than Cloud Backups for Rapid Disaster Recovery

Off-site backups are good – you should have a good backup strategy; however, in practice, when a failure event occurs, you don’t have time to:

1) configure and develop IT infrastructure at a temporary site,

2) roll a restore of the backup (and hope it works),

3) configure everything and get it back up and running, while under the immense pressure associated with a major outage.

Just restoring one terabyte of data over the Internet could take up to a day! (at an effective throughput over the Internet of only 68 Mb/sec at an average 30 milliseconds of latency). Cloud backups are useful as a worst-case-scenario recovery mechanism, to save the company in the unlikely event that both Primary and Secondary sites are permanently destroyed and unrecoverable (unlikely, but it always pays to have a backup).

With SnapReplicate, the data on the Secondary site is always current, ready to go and immediately available whenever it’s required to bring the business back online. Storage is relatively cheap, having a duplicate copy is well worth it when the chips are down.

Saves Time, Money, and Resource

Historically, DR solutions have required duplicate live environments at multiple data centers, which means corresponding costs for equipment, software, and hardware, and IT resources at each site.

With cloud DR using SoftNAS, no hardware is required – at either site.

Amazon EC2 provides on-demand storage and compute capacity as it’s required. SnapReplicate keeps the Secondary site hot with all up-to-the-minute data changes using block replication, which only sends over the actual data changes as they occur in real-time.

How Long Does It Take to Configure SnapReplicate?

SnapReplicate is the fastest, easiest way to configure replication between two sites of any NAS available (even the most expensive NAS by the big brand vendors). How can we prove that claim? Just watch this 6-minute video, and you will see how to configure SnapReplicate between a Primary and Secondary site in less than 5 minutes (including the time required to explain it).

About SnapReplicate

SnapReplicate is a feature of SoftNAS Professional Edition, the most cost-effective and only commercial-grade NAS solution available for DR across Amazon EC2 availability zones and multiple data center regions worldwide.

Check Also

Cloud Disaster Recovery
Using AWS Disaster Recovery to Close Your DR Datacenter